Processing and Managing TimeSolvPay Payments 2026
Take stored, recurring, portal, website, and trust payments, and handle refunds, ACH rejections, and chargebacks. For signups on or after Sept. 24, 2026.
For Processing and Managing TimeSolv Payments for those who signed up for TimeSolvPay prior September 24, 2026, click here.
Create a Stored Payment Method
Click under Clients>Clients & Matters>[Client name]<Payment Settings.
Click on the ‘Enter Credit Card‘ or ‘Enter Bank Account‘ buttons respectively.
Enter Payment for Client with Payment Method on File
Click on Payments>Payments screen.
Select the Client-Matter with a stored payment method on file.
The Payment Method field will auto-populate to the payment method on file.
Enter all the respective payment details and click ‘ Save.’ This will charge the specified payment amount via TimeSolvPay.
Search, View, and Export TimesolvPay Transactions
To search and view TimeSolvPay transactions within TimeSolv, click under TimeSolvPay>Transactions.
Users can use the search facility to narrow down the list being viewed. The search allows users to specify the following:
- Account Type
- Show – All, Linked, Unlinked
- Client-Matter
- From and To Dates
- Transaction Status – Charge, Failed Charge, Refunded, Voided
- Payment Method – i.e., Card (Manual/On File) or ACH (Manual/On File)
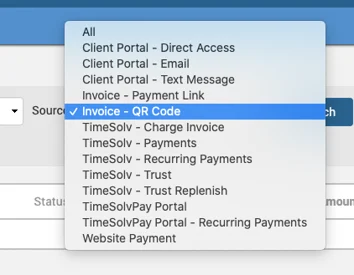
- Source – i.e., Client Portal, TimeSolv, TimeSolvPay Portal, Invoice QR Code, Text Message, etc.:
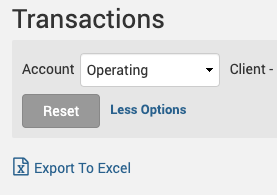
To export TimesolvPay Transactions into an Excel file, click on the ‘Export to Excel‘ link below the search facility.
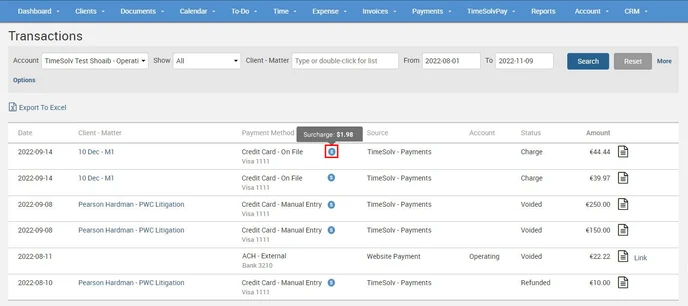
Clicking on the document icon against the listed transaction will pull up details of the transaction.
Transactions with a surcharge against them are displayed with an ‘S’ inside a blue circle. Hovering over the surcharge icon shows a tooltip with the surcharge amount and the rate at which the surcharge is applied.
The surcharge indicator is not displayed against credit card transactions that do not have a surcharge enabled.
The ‘Amount’ column will still show the pre-surcharge value.
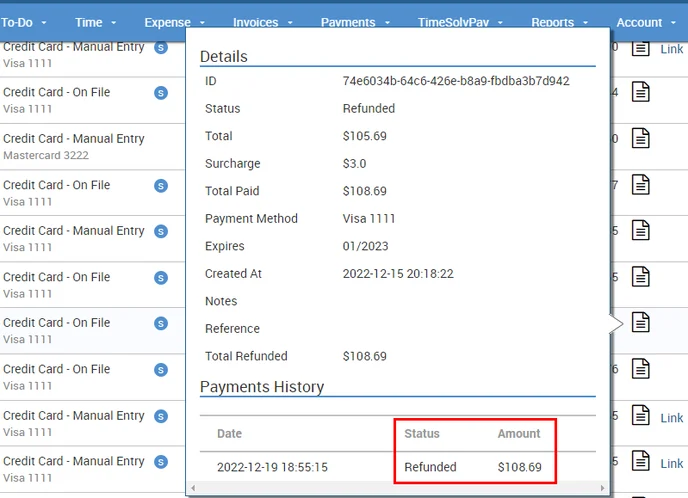
Hovering over the paper icon at the end of the entry brings up a pop-up with the transaction details.
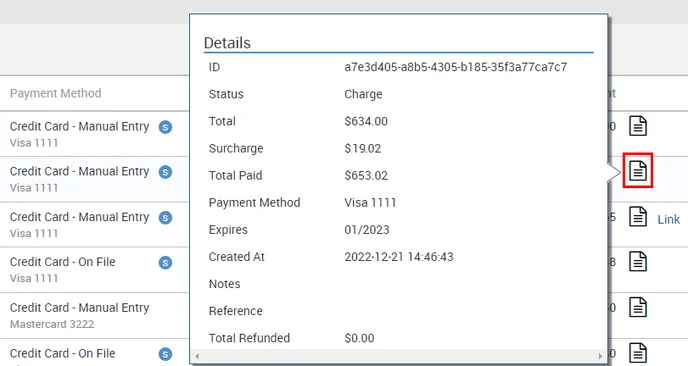
In case of a ‘Refund,’ the details pop-up displays the refunded amount in the ‘Payments History‘ section. The entire amount that includes the surcharge gets fully refunded to the customer.
Unlinking Website Transactions
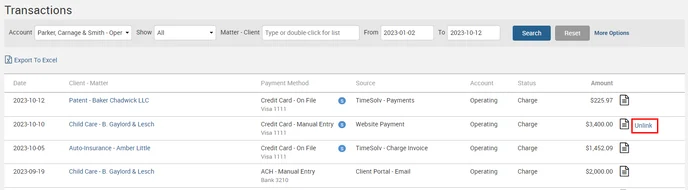
If a Payment gets applied to a Client-Matter by mistake, you can link it to the appropriate Client-Matter by unlinking it from the TimeSolvPay>Transactions screen. Clicking on the “Unlink” option removes the Client-Matter association and returns it to the unlinked state, and the option changes to “Link.” Click on the “Link” option again to link the Payment to a different Client-Matter.
However, you cannot unlink Payments if a linked payment has been allocated to Invoices or those that have been fully/partially transferred to a Trust.
Also, you can only unlink Trust Transactions when removing the transaction from the Trust Account does not bring the Trust Account’s allocated balance below zero. The same condition is applied when a Transfer is made from an Operating Account to a Trust Account.
Note: Currently, the unlink option is only available for Website payments.
Recurring Payments
You can have scheduled payments configured on a Matter.
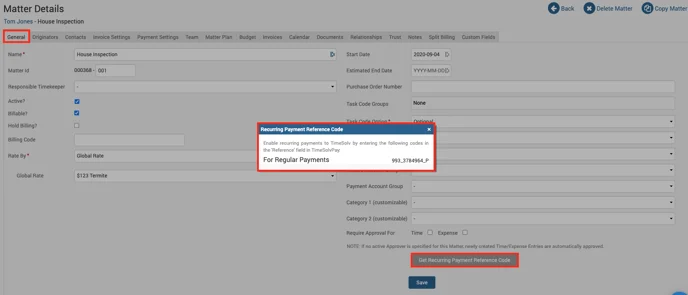
Click on Matter>General>Get Recurring Payment Ref Code. Grab the code and paste it into the TimeSolvPay’s screen’s ‘reference number‘ field.
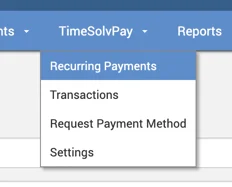
All users who have access to payments can create and track recurring payments within the TimeSolv app by clicking on TimeSolvPay>Recurring Payments from the top menu bar.
Create a new recurring payment by clicking on the ‘New Recurring Payment‘ button at the top right corner of the screen.
All Matters with a payment method on file will be shown in the drop-down list.
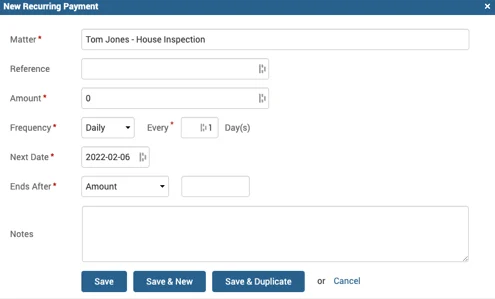
Users have the option to:
- Preview details of the recurring payment – The transaction details will be shown on the document icon.
- Edit the details.
- View history (of successful and unsuccessful payments) – If there is an error against a recurring payment, click on the far-end drop-down next to the entity and pull up the history, showing you where those errors occurred. Users can retry the payment from this screen.
- Pause the payment.
- Search recurring payments – The search drop-down for the ‘Client-Matter’ field will only show those Clients and Matters with recurring payments.
Refund via TimeSolvPay
To refund a payment processed via TimeSolvPay, click on Payments>Payments screen.
Click on the Refunds button on the top right of the screen.
Under the Refundable Payments tab, you can view a list of payments eligible for refund or use the search bar to narrow your list.
If the payment has yet to go through, this means the payment has not been settled and, therefore, cannot be refunded. In that case, the only option is to void the payment or wait for the settlement to process a refund. A payment settlement typically takes up to 24 hours from the time it is processed.
ACH Rejections & Failures
When a TimeSolvPay ACH Transaction fails for some reason, it could be a while before the exact reason can be identified, and this causes dissatisfaction among the customers. An email with appropriate details gets sent to the Firm Admin as soon as there is a failed ACH Transaction.
A failed ACH Transaction Email with the following information is sent out to the Firm Admins, notifying them of the event:
Subject: Failed ACH Transaction
Body:
A failure occurred when attempting to process the following ACH payment:
Date: <DATE>
Amount: <AMOUNT>
Reference: <REFERENCE>
(For linked transactions, displays the reference from the Payment record. For unlinked transactions, displays the Client Name from the Stax transaction meta.)
Notes: <Notes>
(For linked transactions, displays the Notes from the Payment record. For unlinked transactions, displays the Notes/Invoice # from the Stax transaction meta.)
Payment Method: <Bank XXXX>
Client-Matter: <CLIENT-MATTER>
Reason: <REASON FROM STAX> (displayed in bold)
The funds have been reversed to the payor. Please contact your bank to resolve this issue, and for more details regarding the failure.
Chargebacks
Debit or credit card chargebacks are when a disputed charge to a merchant’s account is refunded to the customer’s bank account. Chargebacks are often described as forced refunds, as retailers can only contest a chargeback after it occurs.
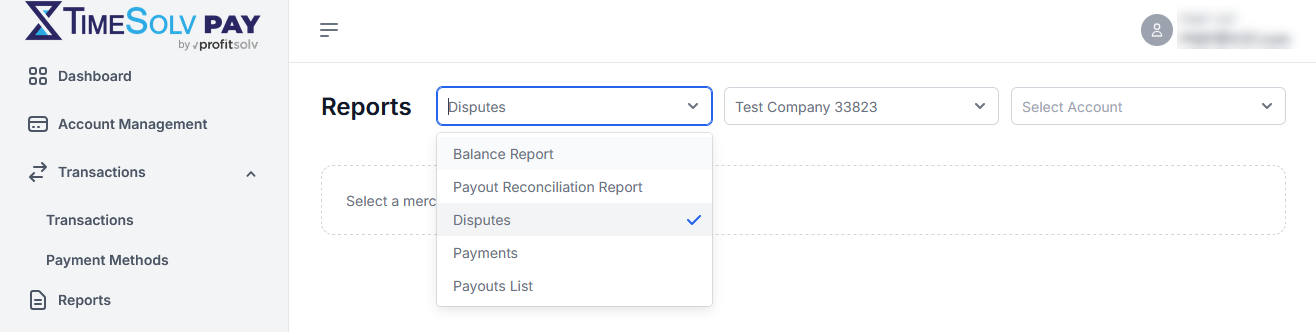
You can view Chargebacks:
- Browse to TimeSolvPay>Settings>TimesSolvPay Portal.
- Navigate to Reports.
- Select the Disputes report.
- In the Select Account field, select your operating or trust account.
Helpful Tips and Best Practices when Responding to Chargebacks
Upload supporting documents that confirm the cardholder authorized the transaction being disputed. Providing proof of authorization (signed receipts/contracts, AVS (address verification system) matches, or proof of service/delivery) will help resolve the dispute.
Charge via Client Portal
To charge payments via the Client Portal so that your Clients can pay you directly via TimeSolvPay, click under Clients>Clients & Matters>[Client name]>Contacts>Edit link against the Contact.
Click here on ‘Enable Payments in the Client Portal’ to learn how to enable Payments from the Client Portal.
If the Client Portal is not enabled, click here on Grant Access to Client Portal.
You can also access the Client Portal from the Invoices sent to you if you have enabled the Client Portal link and QR Code to appear on the Invoices.
To learn how to set up the Flexible Template to show the link, see the Main Page options on the Flexible Billing Template.
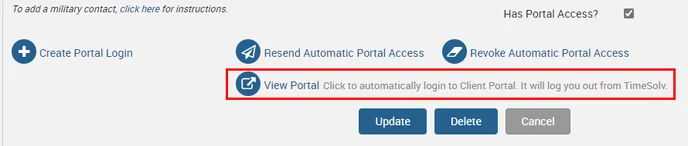
While on the Clients>Clients & Matters>[Client name]>Contacts>Edit screen, scroll to the bottom and click on ‘ View Portal.’ This will automatically log you into the Client Portal and out of TimeSolv.
Under the ‘Invoices‘ tab, click on the checkbox against the invoice you want to be charged. Ensure the payment amount is accurate under the ‘Payment‘ column, as this amount will be locked once you click on the ‘Pay‘ button on the top right of the screen.
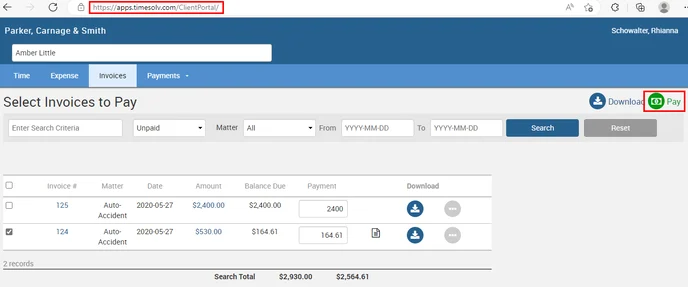
Clicking on the ‘Pay‘ button takes you to the ‘Make Payment‘ screen, where you can select a ‘Payment Method.’
If you do not have a Payment Method stored, click here on ‘Storing Client-Matter Credit Card/Bank Account/eCheck on File‘ to learn more.
Payments can be made by:
- Using a Stored Payment Method
- Entering New Payment Details
Your saved Card is listed, and you can select it to use the Pay via Card button.
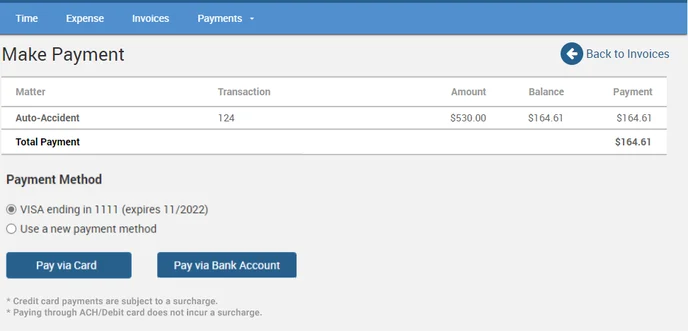
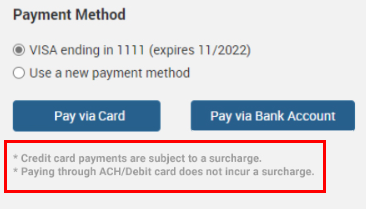
Note: Merchants with surcharging enabled will have their clients incur a surcharge when making payments through the Credit Card using the Client Portal. A surcharge is not incurred on clients using ACH/Debit Card.
A message is displayed towards the bottom of the ‘Make Payments’ screen informing the users about the incurring surcharge:
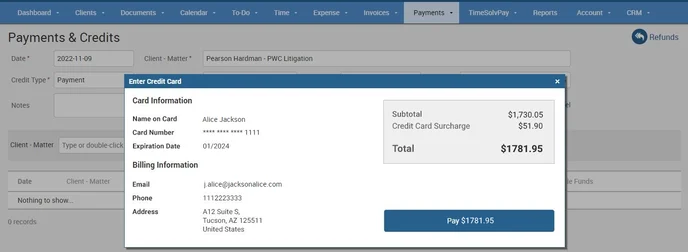
When you click on the ‘Pay via Card’ button, a ‘Review Payment‘ screen allows you to review the amount and surcharge applicable before you make the payment.
Clicking on the ‘Pay’ button initiates the payment, with the button displaying the total amount the Card will be charged.
Once you charge the payment, log back into your TimeSolv account and click on the Payments>Payments screen. At the bottom of the screen, select the ‘Status‘ as ‘All‘; once you hit the Search button, the Payment should be listed.
The balance should also appear as paid under the Invoices>Sent screen.
Website Payments
Website Payments is another avenue for firms to collect payments through their website. The Firm’s customers can access the Payment form by following the link on the firm’s website and pay outstanding invoices or make retainer payments.
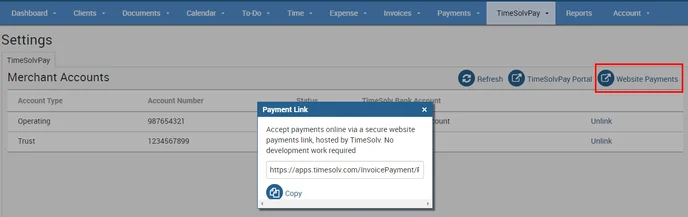
Clicking the TimeSolvPay>Settings>Website Payments button opens a pop-up with the form’s link. Copy this link and paste it into a new browser tab to open the TimeSolv Website Payments form.
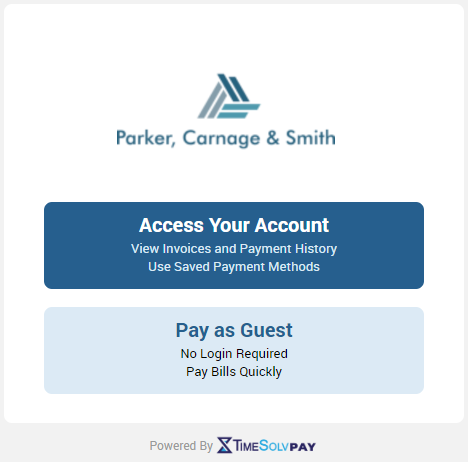
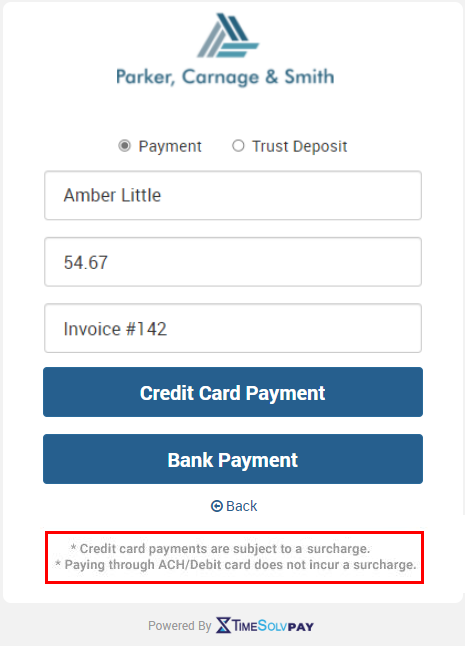
The ‘Pay as Guest’ option notifies the user that Credit Card payments are subject to a surcharge. A Review Screen with credit card details and billing information is displayed when clients select the ‘Credit Card Payment’ option to make the payment.
The amount field is a numeric field and will not accept non-numeric characters like commas, etc.
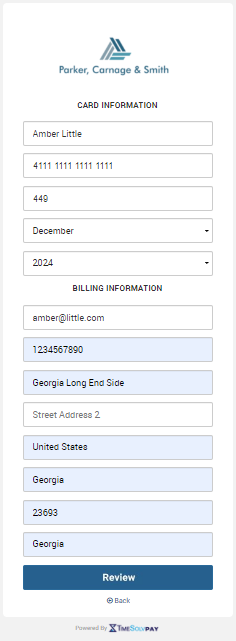
When you click on the ‘Review’ button, the ‘Card Information‘ screen allows you to review the amount and surcharge applicable before you make the payment.
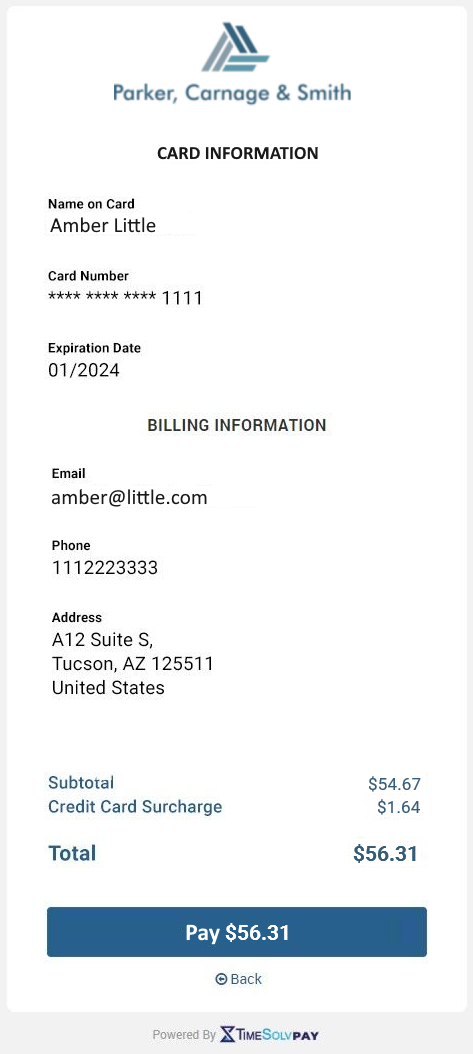
Clicking on the ‘Pay’ button initiates the payment, with the button displaying the total amount the Credit Card will be charged.
Once you charge the payment, log back into your TimeSolv account and click on the Payments>Payments screen. At the bottom of the screen, select the ‘Status‘ as ‘All,’ and once you hit the Search button, the Payment should be listed.
The balance should also appear as paid under the Invoices>Sent screen.
Receiving Trust Payments via TimeSolvPay
If you have a Client configured to receive portal payments in a Trust Account ( Clients>Clients and Matters>[Client name]>General>Receive all Payments in: Trust), send their invoice via the Invoices>Drafts screen.
Once the invoice is sent, head into Clients>Clients & Matters>[Client name]>Contacts>Edit link against the Contact.
Scroll to the bottom of the screen and click on ‘ View Portal.’ This will automatically log you into the Client Portal and out of TimeSolv.
Under the ‘Invoices‘ tab, click on the checkbox against the invoice you want to be charged. Ensure the payment amount is accurate under the ‘Payment‘ column, as this amount will be locked once you click on the ‘Pay‘ button on the top right of the screen.
Under the Client Portal Payments>Payment History screen, the payment you processed should appear as a Trust transfer.
It should also appear as a Trust transfer when viewed under Payments>Payments>Status: Allocated and Payments>Trust screens.
Email Notifications
| Description | Source | TimeSolv Email to Admin | TimeSolv Email to Client | Stax Email to Client |
| Payment on File | Virtual Terminal | No | No | Yes |
| Payment: Manual | Website Payment | No | No | Yes |
| Client Portal Payment on File | Virtual Terminal | Yes | No | Yes |
| Client Portal Payment Manual | Website Payment | Yes | No | Yes |
| Website Payment: Guest | Website Payment | Yes | No | Yes |
| Website Payment: Bank Account-on-file | Virtual Terminal | Yes | No | Yes |
| Website Payment: Bank Account-manual | Website Payment | Yes | No | Yes |
| Recurring Payments | Virtual Terminal | Yes | No | No |
| Refunds, Manual | Website Payments | No | No | No |
| Refunds on File | Virtual Terminal | No | No | No |
| Trust Deposits | Website Payment | No | No | Yes |
| Client Portal Creation | No | Yes | No | |
| Access your account | No | Yes | No |
Emails on Failed Transactions
| Description | Source | TimeSolv Email to Admin | TimeSolv Email to Client | Stax Email to Client |
| Payment on File | Virtual Terminal | No | No | No |
| Payment: Manual | Website Payment | No | No | No |
| Client Portal: Payment on File | Virtual Terminal | No | No | No |
| Client Portal: Payment Manual | Website Payment | No | No | No |
| Website Payment: Guest | Website Payments | No | No | No |
| Website Payment: Bank Account-on-file | Virtual Terminal | No | No | No |
| Website Payment: Bank Account-manual | Website Payments | No | No | No |
| Recurring Payment | Virtual Terminal | Yes | No | No |
| Refunds Manual | Website Payments | No | No | No |
| Refunds on File | Virtual Terminal | No | No | No |